Enlightenment Embroidery Project

Cricut/ Aurifil Floss Color Chart Conversion
This week I was playing again with my Cricut Maker and Cintiq 16 drawing display... Are you curious?

Click here to visit Island Batik’s page!
#carolinaasmussen #cricut #cricutmaker #cricutcreated #graphicdesign #digitalcrafting #illustrator #design #digitaldesign #cricutmade #embroidery #handembroidery #enlightenment #crafts #embroideryhoop #slowstitching #qualitytime #slowstitch #canvas #drawandcut #embroiderypattern #quotes #quoteoftheyear #handstitched #handstitching #thichnhathanh #thichnhathanhquotes #dmcembroideryfloss #aurifil #aurifilthread #auverasoie #hobbsbatting
Last Christmas I gifted myself with a Cricut maker, you can read all the "whys" on my January's post "Make the Onions Cry". And after 5 months of intensive and unusual use I still think the Cricut maker is the most amazing machine from my quilting studio (and believe me I have a lot of machines here!)
The embroidery's hoop patterns idea started with the "draw" function. Since the machine can draw, of course it will draw for me ;). And it does beautifully, mimics my sketches like my own hand on my drawing display SVG files and I can't get enough of this, it's always magical!
Ok, I like to draw free hand in the illustrator and it is pretty much how I work, and now you are maybe thinking "ok I don't work this way, this is not for me". STOP! It is for you. You can use the iPad and apple pencil with Procreate to sketch your own designs, or even work some images in Photoshop, there are so many possibilities to use an image file jpg, gif, png, bmp, dxf and my favorite svg to make it work on Cricut Design Space! (talking about this don't forget to search for the "Enlightenment Embroidery Hoop" project there, it is free)
After all my design concept is done and already in the Cricut Design Space, I choose the colors of the fine point pens for each design element and also what I it needs to be drawn or cut.
I like to use white cotton fabric, but some motive fabric could also work. For this specific project you will need a 10" square of fabric and the Cricut pink grip mat (for fabric), I also like to secure the fabric with "washi tape" into the mat, because the machine will be drawing and sometimes a little bump on the fabric can damage the project. You want to keep the fabric as flat as possible during the entire time the machine is working.
You also don't need to be worried about the pencil's color order because the machine will stop every time and "ask" you to change to the right color and guide you through all the steps until the project is done! Like... really?! Yup.

In less than 30 minutes I had an original embroidery pattern "printed" directly from my free hand sketch to the fabric!
You are probably asking yourself what are those dots around the circle. The dots are registration marks to help me to "close" the fabric on the back side of the loop after I finish all the stitching. (I will be talking about this soon)

Believe me or not, the stitching part was the real challenge, because with my studio moving I completely lost track of where all my DMC embroidery thread is stored. So I was thread hunting the entire studio, so for this project it was a real "task force" and combinations of different colors and threads, like Aurifil floss and also Aurifil 12wt in cotton, and I couldn't resist to add some sparkling with Au Ver a Soie.
I hope that I can find my embroidery thread collection soon!

And going back to the mysterious dots around the circle fabric, that's it! This is how I like to secure the excess of fabric on the back of the hoop. Some people just cut it, but I really don't think it is a good solution, because with time the fabric sometimes looses a little bit of the tension inside the hoop and this is a good way to keep your work secure a long the years.

Some people are ok with just this step to finish, but I also like to use the inner circle of the hoop as a template to cut a circle of Hobbs batting and hand stitch covering the back side of the hoop. This step will also protect you walls and your work against any dust.
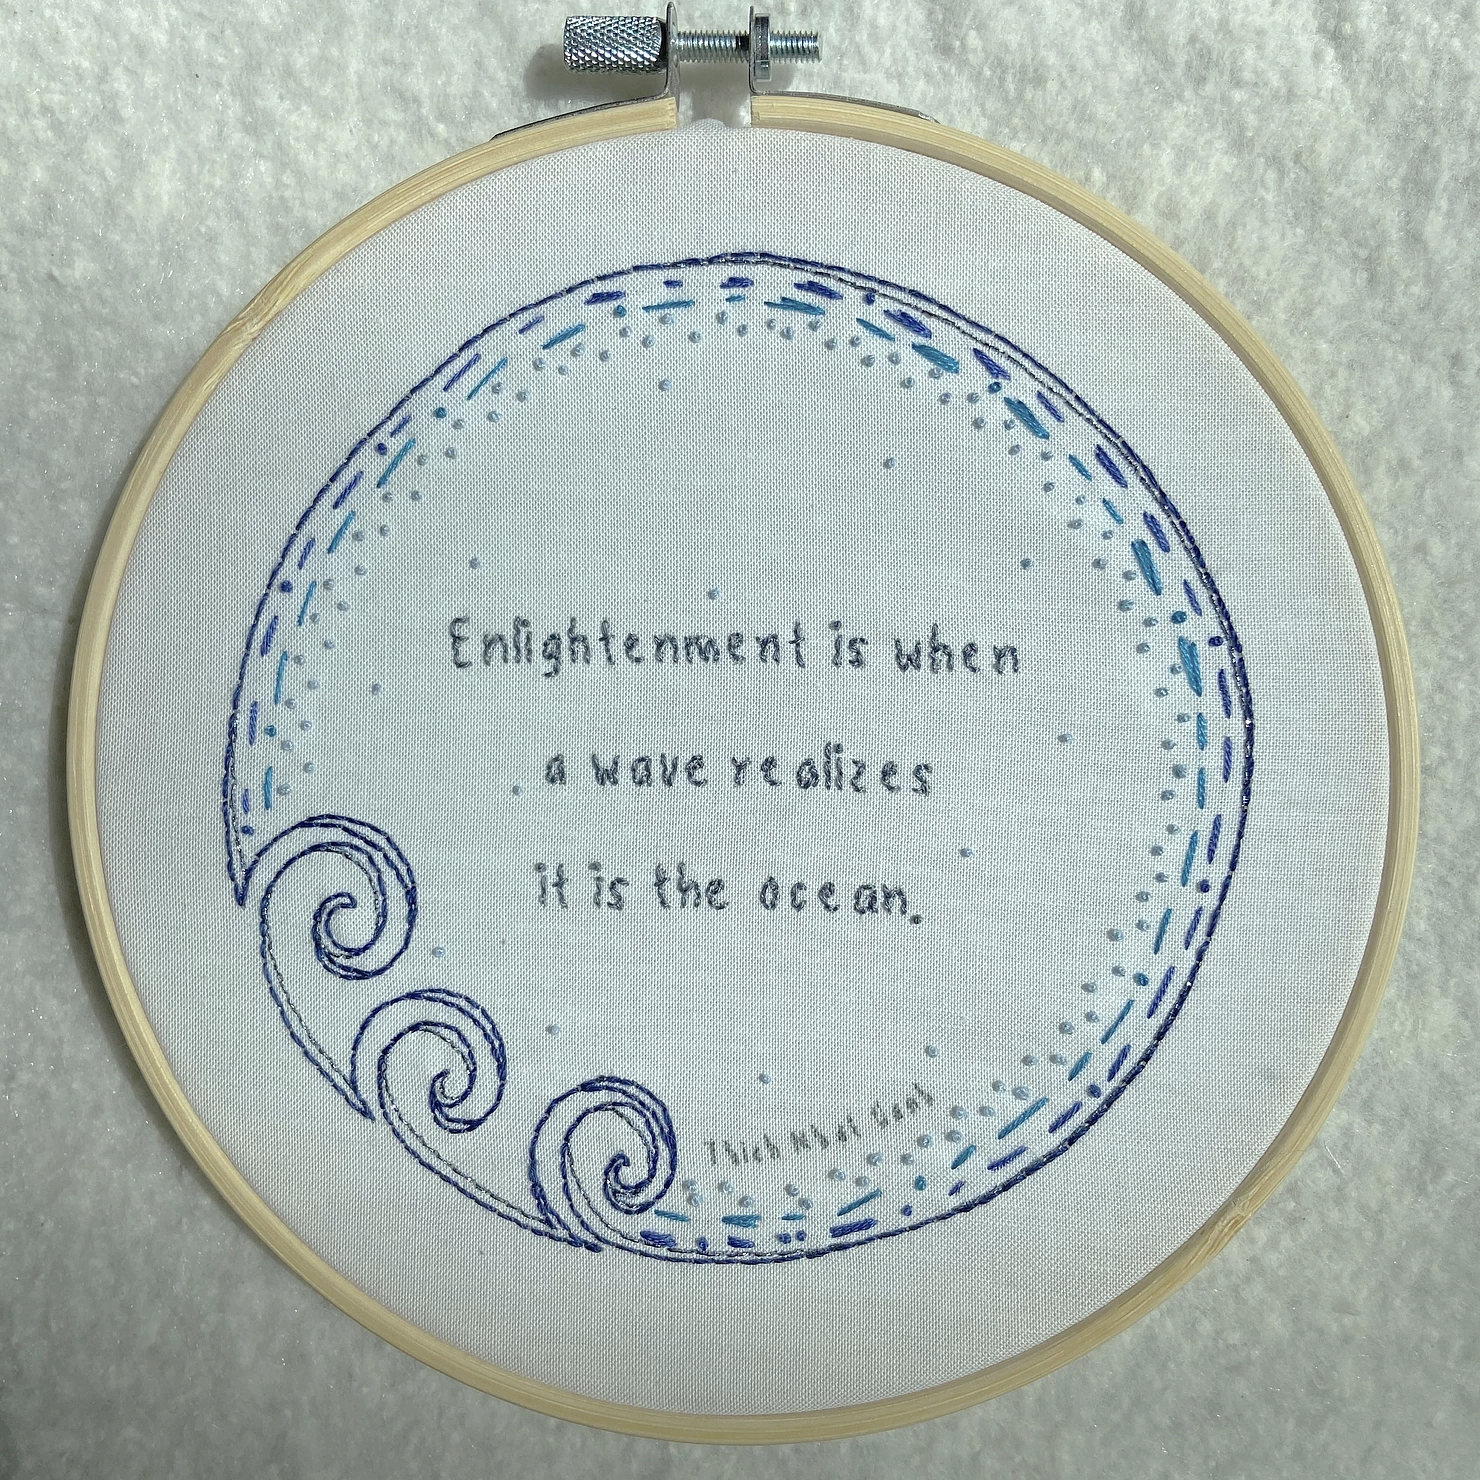
"Enlightenment" embroidery hoop, by Carolina Asmussen
So now, GIVEAWAY TIME!!! (*only US*) Leave a comment below for a chance to win one of the 3 Enlightenment embroidery canvas with 7" hoop and the Hobbs batting circle for the fancy finishing (the thread is on you this time)! Giveaway closes on Sunday 5.31 at 10pm NYC time.

Giveaway closes on Sunday 5.31 at 10pm NYC time
Good luck and see you here on Sunday night ;)
Giveaway CLOSED and the lucky winners are Mayra Alexandra, Sarah Porter and Shanon Pacini! Congratulations girls and I will be messaging you tomorrow to get the addresses!